Troubleshooting Lava A1 Display Lighting Problems: Quick and Easy Solutions
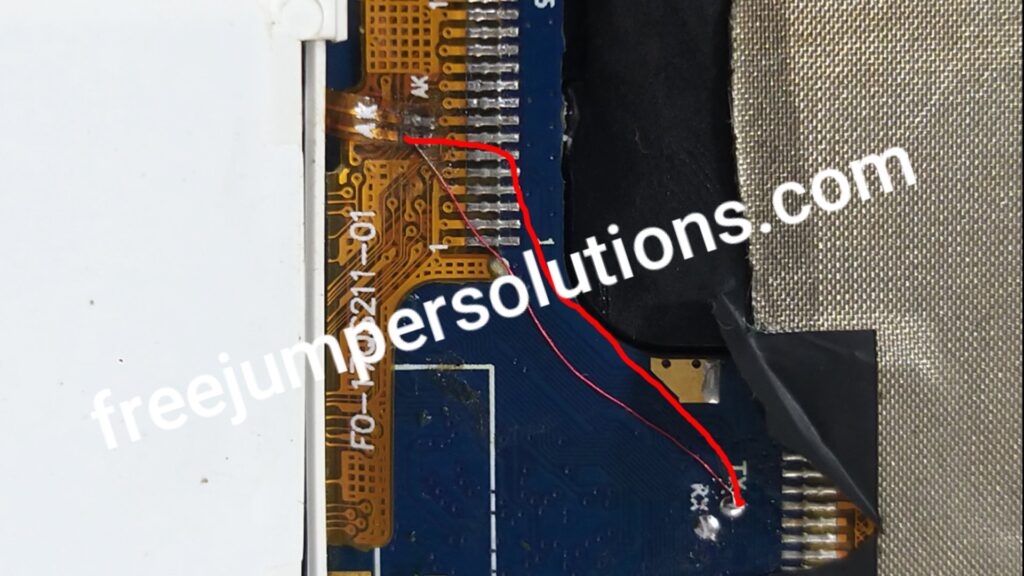
Lava a1 display light jumper
The Lava A1 is a budget-friendly phone that has a lot to offer. However, there are times when the phone’s display lighting may stop working or become problematic. This can be a frustrating issue for any user. If you are experiencing display lighting problems with your Lava A1, don’t worry! There are some quick and easy solutions that you can try before resorting to a technician. In this post, we will walk you through some troubleshooting steps to help you fix your Lava A1’s display lighting issues. From checking the phone’s settings to replacing the display, we will cover everything you need to know to get your Lava A1’s display lighting up and running again.
1. Introduction: Common display lighting problems in Lava A1
Introduction: Common display lighting problems in Lava A1
The Lava A1 is a popular and affordable mobile phone that offers great features and functionality. However, like any electronic device, it is not immune to technical issues. One of the most common problems that users encounter is related to display lighting. This can be frustrating, as a dim or non-functional display can severely hinder the user experience and make it difficult to navigate the phone’s interface.
There are several display lighting problems that Lava A1 users may come across. One common issue is the backlight not turning on or being too dim, making it hard to see the screen in low-light conditions. Another problem is the display flickering or flashing intermittently, causing visual disturbances and making it challenging to read or view content on the phone.
These display lighting problems can arise due to various factors, such as software glitches, hardware issues, or incorrect settings. In this blog post, we will explore some quick and easy troubleshooting solutions to help you resolve these issues and get your Lava A1’s display lighting back to optimal functionality. By following these steps, you can save time and potentially avoid the need for professional assistance or costly repairs.
So, if you’re experiencing display lighting problems with your Lava A1, don’t worry! We’ve got you covered. Read on to discover simple yet effective solutions that can help you overcome these issues and enjoy a seamless user experience with your Lava A1 mobile phone.
2. Checking the display settings: Adjusting brightness and contrast
When faced with display lighting problems on your Lava A1, one of the first steps you should take is to check and adjust the display settings. Sometimes, the brightness or contrast settings may be misconfigured, leading to issues with the display lighting.
To begin, navigate to the settings menu on your Lava A1. Look for the display or screen settings option, which may vary depending on the version of the operating system you are using. Once you locate the display settings, you will likely find options to adjust the brightness and contrast levels.
Start by adjusting the brightness level. Increasing the brightness can make the display appear brighter, while decreasing it can reduce the intensity of the lighting. Make small adjustments and observe the changes on the screen to find the optimal brightness that suits your preference.
Similarly, you can also adjust the contrast level. Increasing the contrast can enhance the color vibrancy and make the display appear sharper, while reducing it can make the colors appear softer. Experiment with different contrast settings to find the one that provides the best viewing experience for you.
It’s worth noting that the ideal brightness and contrast levels may vary depending on the lighting conditions around you. If you are in a well-lit environment, you may need to increase the brightness for better visibility. On the other hand, in a dimly lit room, reducing the brightness can help prevent eye strain.
By checking and adjusting the display settings on your Lava A1, you can often resolve display lighting problems quickly and easily. However, if the issue persists despite these adjustments, there may be other underlying causes that require further troubleshooting.
3. Restarting the device: Simple fixes for temporary glitches
When faced with display lighting problems on your Lava A1 device, a simple yet effective troubleshooting step is to restart the device. This may seem like a basic solution, but it can often resolve temporary glitches and restore proper functionality to the display lighting.
To restart your Lava A1, press and hold the power button until the power menu appears on the screen. Then, select the option to restart the device. Allow the device to shut down completely and then power it back on.
Restarting the device can help clear any temporary software or hardware issues that may be causing the display lighting problems. It essentially gives the device a fresh start, allowing it to recalibrate and restore normal functioning.
Additionally, restarting the device can also help in cases where certain settings or configurations have been inadvertently changed, leading to display lighting issues. By restarting, the device reverts to its default settings, which may resolve any misconfigurations causing the problem.
Remember to give the device a few moments after restarting to fully boot up and stabilize. Once it is back up and running, check if the display lighting issue has been resolved. If not, you can move on to other troubleshooting steps to further diagnose and address the problem.
In many instances, a simple restart can work wonders in fixing temporary glitches and ensuring that your Lava A1’s display lighting is functioning optimally. It is a quick and easy solution that can save you time and effort in troubleshooting more complex issues.
4. Software updates: Ensuring the latest firmware version
Keeping your Lava A1 smartphone up to date with the latest firmware version is crucial for resolving display lighting problems. Software updates often include bug fixes and performance improvements that can address issues related to the display lighting.
To check for software updates on your Lava A1, follow these simple steps:
1. Go to the Settings menu on your device. You can usually find it by swiping down from the top of the screen and tapping on the gear icon.
2. Scroll down and find the “System” or “About phone” option. Tap on it to access more settings related to your device.
3. Look for the “Software updates” or “System updates” option. In some cases, it may be listed under “Advanced settings.”
4. Tap on “Software updates” to check for any available updates for your device. If an update is available, follow the on-screen instructions to download and install it.
By ensuring that your Lava A1 is running on the latest firmware version, you can often resolve display lighting problems caused by software glitches or compatibility issues. These updates are designed to enhance the overall performance of your device, including its display functionality.
If you continue to experience display lighting problems even after updating the software, it is recommended to reach out to Lava customer support or visit an authorized service center for further assistance. They can provide you with more specific troubleshooting steps or arrange for a repair if necessary.
Remember, keeping your device’s software up to date is not only important for resolving display lighting issues but also for maintaining the overall security and performance of your Lava A1 smartphone. Regularly checking for updates and installing them promptly can help ensure a smoother and more reliable user experience.
5. Clearing cache and data: Resolving potential software conflicts
When facing display lighting problems on your Lava A1 phone, it’s essential to consider potential software conflicts as the underlying cause. One of the simplest and most effective solutions is to clear the cache and data on your device.
Cache and data are temporary files and settings that accumulate over time. These files can sometimes become corrupted or outdated, leading to various software issues, including display lighting problems. By clearing the cache and data, you can effectively eliminate any potential conflicts that may be affecting your phone’s performance.
To clear the cache and data on your Lava A1, follow these steps:
1. Go to the “Settings” menu on your phone.
2. Scroll down and select “Apps” or “Applications.”
3. Look for the app that is experiencing display lighting problems (e.g., “Display Settings,” “Brightness Control,” etc.).
4. Tap on the app and then select “Storage.”
5. You will see options to clear the cache and clear data. Start by clearing the cache first.
6. After clearing the cache, restart your phone and check if the display lighting issue has been resolved. If not, repeat the steps and this time, choose to clear the data.
Clearing the cache and data can help resolve conflicts with the app’s settings, preferences, or temporary files that may be affecting the display lighting. It’s important to note that clearing data will reset the app to its default settings, so any personalized configurations may be lost. However, this step is often necessary to ensure a fresh start and troubleshoot the problem effectively.
By addressing potential software conflicts through cache and data clearing, you can significantly improve the performance of your Lava A1’s display lighting and enjoy a hassle-free experience with your device.
6. Checking for physical damage: Inspecting the screen for cracks or water damage
When faced with display lighting problems on your Lava A1 phone, it’s crucial to inspect the screen for any physical damage such as cracks or water damage. Physical damage can often be the root cause of display issues, and identifying it early on can save you time and effort in troubleshooting.
Start by gently wiping the screen with a microfiber cloth to remove any smudges or dirt that may be obstructing your view. Once the screen is clean, carefully examine it for any visible cracks or scratches. Cracked screens can cause disruptions in the display lighting, leading to dim or unevenly lit areas.
If you notice any cracks, it’s important to take immediate action. Depending on the severity of the damage, you may need to replace the screen or seek professional repair services. Ignoring cracked screens can further worsen the display lighting problems and potentially affect the overall functionality of your device.
Water damage is another common culprit behind display lighting issues. If your phone has been exposed to moisture or liquid, it’s essential to check for signs of water damage. Look for watermarks, discoloration, or foggy areas on the screen. These indicators suggest that liquid has penetrated the display components, compromising the lighting functionality.
In case you detect any water damage, it’s advisable to power off your device and avoid using it until the issue is resolved. You can try drying the phone by placing it in a bag of uncooked rice or using silica gel packets to absorb the moisture. However, keep in mind that these methods may not always be effective, and seeking professional assistance may be necessary.
By carefully inspecting your Lava A1 phone for physical damage, specifically cracks or water damage, you can identify potential causes of display lighting problems. Addressing these issues promptly will increase the chances of finding quick and easy solutions, ensuring that your device functions optimally once again.
7. Testing with another charger: Addressing potential power supply issues
When experiencing display lighting problems with your Lava A1, it’s crucial to consider potential power supply issues as a possible cause. One simple way to troubleshoot this is by testing the device with another charger.
First, ensure that your current charger is functioning properly. Check for any visible damages, frayed wires, or loose connections. If everything appears to be in order, try connecting the charger to a different power outlet. Sometimes, the problem may lie with the power source itself, such as a faulty socket.
If the charger seems to be fine and the issue persists, it’s time to borrow another charger that is compatible with your Lava A1. This could be from a friend, family member, or even a local electronics store. Make sure the replacement charger is of the same voltage and current rating as the original one.
Connect your Lava A1 to the borrowed charger and observe if the display lighting problem persists. If the display lights up properly with the new charger, it indicates that the issue was indeed with the original charger. In such cases, it’s advisable to replace the faulty charger to avoid any further complications.
However, if the problem remains even with the different charger, it suggests that the power supply is not the root cause. You may need to explore other troubleshooting steps to identify and resolve the display lighting problem.
Remember, testing with another charger is just one step in troubleshooting display lighting issues on your Lava A1. By systematically eliminating potential causes, you can eventually pinpoint the exact problem and find an appropriate solution.
8. Enabling auto-brightness: Allowing the device to adjust lighting based on ambient conditions
One of the common display lighting problems faced by Lava A1 users is inconsistent brightness levels. Sometimes the screen may appear too dim, making it difficult to read or view content, while at other times it may be too bright and strain the eyes. Thankfully, the Lava A1 offers a convenient solution to this issue – enabling auto-brightness.
Auto-brightness is a feature that allows the device to automatically adjust the screen brightness based on the surrounding ambient conditions. By utilizing the built-in light sensors, the device can intelligently adapt to various lighting environments, providing optimal brightness for comfortable and clear viewing.
To enable auto-brightness on your Lava A1, follow these simple steps:
1. Open the settings menu: Start by locating and opening the settings menu on your device. This can usually be done by tapping on the gear icon, which represents settings, in the app drawer or notification shade.
2. Access display settings: Within the settings menu, scroll down or search for the “Display” or “Display & Brightness” option. Tap on it to access the display-related settings.
3. Enable auto-brightness: Look for the “Auto-Brightness” or “Adaptive Brightness” option within the display settings. It may be located under the “Brightness” section or in a separate sub-menu. Once found, toggle the switch or checkbox to enable auto-brightness.
4. Adjust the brightness level: In some cases, you may also have the option to manually adjust the default brightness level. If desired, set the brightness level to your preference, and the auto-brightness feature will work around that set value.
By enabling auto-brightness on your Lava A1, you can experience a more seamless and comfortable viewing experience. The device will intelligently adapt to different lighting conditions, ensuring that the screen is neither too dim nor too bright.
Remember, if you still encounter display lighting problems even with auto-brightness enabled, it is worth considering other troubleshooting steps or seeking assistance from Lava’s customer support.
9. Resetting to factory settings: Troubleshooting persistent display lighting problems
If you’ve tried all the previous troubleshooting steps and are still facing persistent display lighting problems with your Lava A1, resetting the device to factory settings may be the next solution to consider. This step can help resolve any software issues that might be causing the problem.
Before proceeding with a factory reset, it’s important to note that this will erase all data and settings on your device. Make sure to back up any important files or data to avoid losing them during the process.
To reset your Lava A1 to factory settings, follow these steps:
1. Go to the “Settings” menu on your device. You can usually access this by navigating to the main menu and selecting the “Settings” option.
2. Look for the “Backup & Reset” or “Privacy” option in the settings menu. The location of this option may vary depending on your device’s software version.
3. Within the “Backup & Reset” or “Privacy” menu, you should find an option called “Factory Data Reset” or similar wording. Tap on this option to proceed.
4. You may be prompted to enter your device’s PIN or password for security purposes. Enter the required information to proceed with the factory reset.
5. A confirmation screen will appear, informing you about the consequences of performing a factory reset. Make sure you have backed up any important data before proceeding. If you’re ready to proceed, select the “Reset” or “Erase Everything” option.
6. The device will then begin the reset process, which may take a few minutes. Once the process is complete, your Lava A1 will restart and return to its original factory settings.
After the factory reset is complete, set up your device again and check if the persistent display lighting problems have been resolved. If the issue persists, it may indicate a hardware problem, and contacting Lava customer support or visiting a service center would be advisable.
Remember, a factory reset should be considered as a last resort when all other troubleshooting steps have been exhausted.
10. Seeking professional assistance: Contacting customer support or visiting a service center
If you’ve exhausted all the DIY solutions and your Lava A1 display lighting problems still persist, it may be time to seek professional assistance. Lava provides excellent customer support services to help you resolve any technical issues you may be facing with your device.
The first step is to reach out to Lava’s customer support team. They can be contacted through various channels such as phone, email, or live chat. Be prepared to provide them with detailed information about the problem you’re experiencing, including any troubleshooting steps you’ve already taken. The customer support team will guide you through additional troubleshooting steps or may recommend bringing your device to a service center for further inspection.
Visiting a Lava service center can be a wise decision if your device requires physical repairs or if the display lighting issue is more complex. Lava has authorized service centers staffed with trained technicians who specialize in diagnosing and fixing technical problems with Lava devices. They have the necessary expertise, tools, and genuine spare parts to ensure your device gets the best care possible.
When visiting a service center, make sure to carry your device, along with any relevant documents such as warranty cards or purchase receipts. Explain the issue you’re facing in detail to the service center staff, and they will initiate the necessary steps to diagnose and resolve the problem. Depending on the severity of the issue, the resolution may involve repairs, part replacements, or software updates.
Remember, seeking professional assistance is often the best course of action when dealing with complex technical problems. Lava’s customer support and service center teams are dedicated to providing prompt and efficient solutions to ensure your Lava A1 display lighting problems are resolved, allowing you to enjoy your device without any hindrances.
Hi friends l will discuss here the lava a1 display light problem jumper, ways solution. I have already given a video on YouTube. You can do this by watching that video, and I’ve given a link here so you can watch this video by clicking this link :-